Welcome back! Last week I started exploring how to make the most of the local adjustment editing tools when it comes to further refining them with the new Range Mask function, auto masking, and erasing with the brush. In some instances, we may find that a combination of them all is what is needed to get the job done.
Graduated Filter, Radial Filter, and Brush
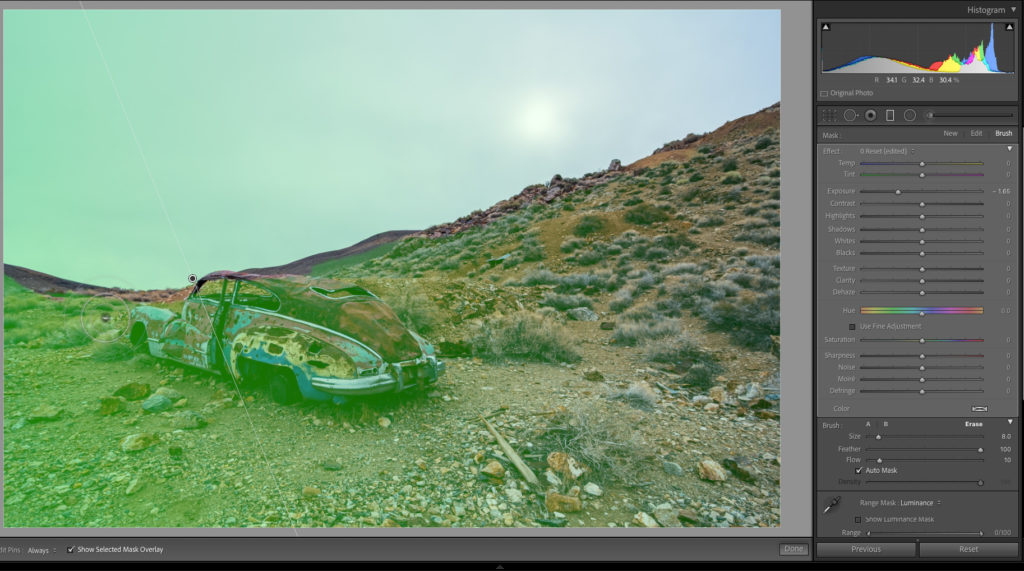
Let’s look at another example where I want to use a Graduated Filter across the sky to darken and slightly desaturate the sky furthest from the sun in a gradual fade toward the sun, but not affect the foreground at all. After selecting the Graduated Filter from the Toolstrip (or any of the local adjustment tools), I suggest double-clicking the Effect label at the top to reset all adjustments. Then I clicked in the sky to the left of the sun and dragged toward the sun. I stretched the handles on the Graduated Filter very far apart for a large gradient from darker to lighter, and while I’m getting what I want in the sky, it is darkening the foreground too much (it can help to zoom way out to see beyond the photo and resize a large gradient). Due to the similarity of luminance values between the darker sky and the foreground, the Luminance Range Mask isn’t going to help me here, and while I could try using Color Range Mask, I think there is enough contrast between the sky and the ground that I can use the erase function of the Brush within the Graduated Filter.

A couple of things to keep in mind when erasing a Graduated or Radial Filter:
- Erasing removes the Filter where you click and drag the brush. You can use lower Flow values in the brush settings to build up or fade out your brush strokes, but you are completely erasing the adjustment.
- If you use the A or B Brush to brush on settings you are painting with the full amount of whatever settings are included, meaning that you are not painting with a gradient. As a result, if you accidentally erase part of the gradient you want to keep it is better to undo that move than to try to paint the gradient back in (or it won’t blend well).
- Use lot’s of short strokes to erase in case you need to undo a stroke due to a mistake, otherwise you may have to undo more than you want.
- Once you erase part of the mask, you don’t want to move the pin associated with that adjustment or the part you brushed will no longer align with the area you wanted to remove from the adjustment. So make sure the Grad or Rad Filter is where you want it before you erase.
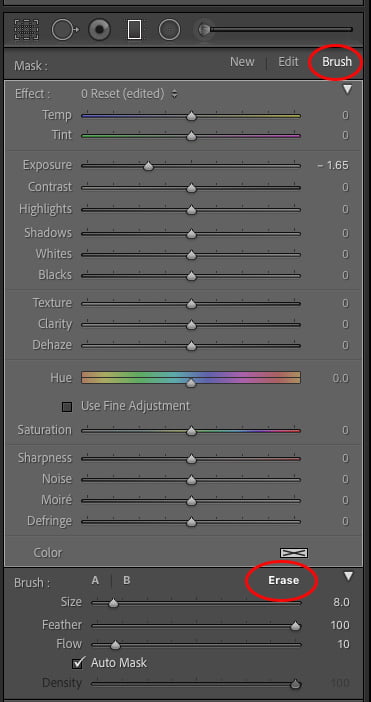
To that end, I selected the Brush within the Graduated Filter’s adjustment panel (not the separate Adjustment Brush up in the Toolstrip), and clicked Erase in the Brush settings panel. After enabling Auto Mask, I painted in a series of short strokes just along the edge between the foreground and the sky to let Auto Mask prevent erasing the filter from the sky region. This worked very well. Press and hold the Spacebar, then click with the mouse to Zoom in to 100% to better see the edge as you brush (repeat that move with the Spacebar to Zoom out). Once I cleaned up the edge against the sky, I disabled Auto Mask, increased the Brush size, set Feather to 0, and erased the rest of the foreground.

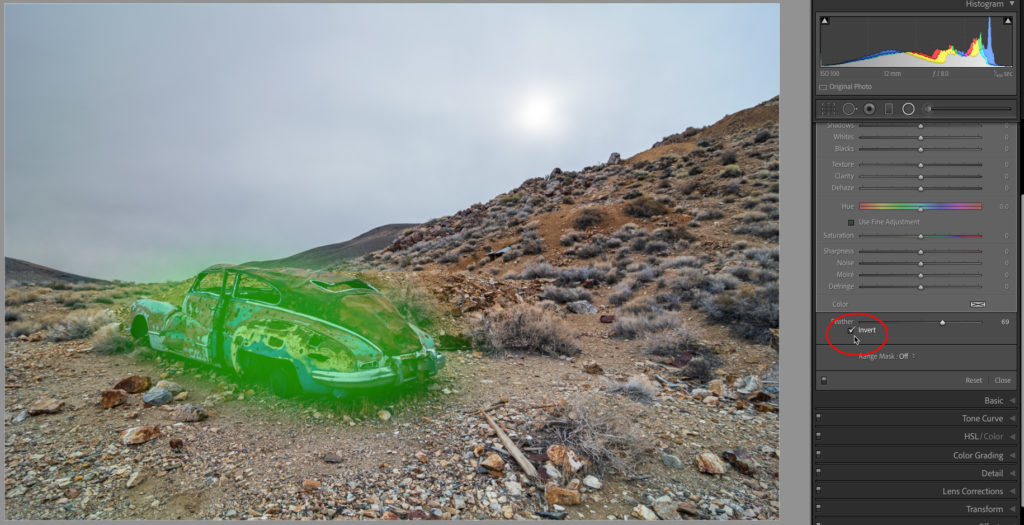
From there I wanted to make the car stand out more from the foreground, so I grabbed the Radial Filter and drew a tight oval around the car, and checked the Invert box below the Feather slider to set the area inside the oval to be what is affected. Increasing the Feather amount will start to fade the adjustment from the area outside the car, but to really limit the affected area further I’ll use the Color Range Mask to tighten it up.

Choosing Color from the Range Mask drop-down menu, I grabbed the Color Range Selector, and holding the Shift key down, I clicked five different colors on the car to sample the color ranges to include in the adjustment. Dialing down the Amount slider tightens it up a little more. Now it is time to dial in the desired settings, such as increasing Exposure, Texture, Clarity, Saturation, and Sharpness, to make the car pop off the ground. Again, toggling the switch to see the before and after this panel’s adjustment shows me that although I can see some overlay spray outside the car, due to the high Feather and Color Range mask there is actually very little visible impact from my settings outside of the car. If needed, I could use the Brush to erase with a low Flow and clean up anything that was visually standing out from my adjustment.

Using all of these tools together gives us an amazing amount of control and power to adjust locally in a variety of situations. We just may need to experiment with the right combination of tools and masks to get the job done.
The post Making the Most of Local Adjustments and Their Masks: Part 2 appeared first on Lightroom Killer Tips.
![[DEV]Schenectady Photographic Society](https://dev.spsphoto.org/wp-content/uploads/2020/03/newsitelogo5-e1584673483198.png)